1. Ensure that the data cable is connected to the XP XPRINTER 420B unit.
2. Insert the USB connector of the XP XPRINTER 420B on the POS Terminal (iMin Swan 1 Pro) which can be seen at the back of the main display monitor.
Note: If you are using a tablet POS (iMin Falcon 2), you will need to connect the USB through an external Type-C Adapter.
3. Sticker paper should be inserted inside the printer unit following the center alignment guide.
4. Log in to the Mosaic Back Office Console using your account.5. On the Menu List, select “Store Settings”.
6. Click “Printers”.
7. On the IP Address Column, look for “LOCAL-USB” and click “Edit”.
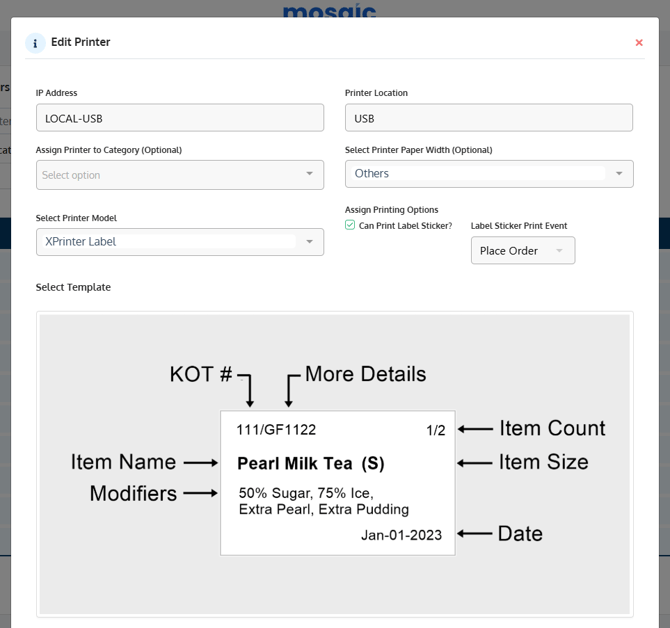
-
- IP Address: LOCAL-USB
- Printer Location: USB or USB Printer
- Select Printer Paper Width: Other
- Select Printer Model: XPrinter Label
- Can Print Label Sticker: Enabled
- Label Sticker Print Event: Place Order
Note: Printers can be assigned to individual/multiple categories depending on the hardware setup (use of multiple printers).
9. Click “Update”.
Link on How to Load Sticker Paper to Sticker Printer:
https://support.mosaic-solutions.com/migration/knowledge/how-to-load-sticker-paper-to-sticker-printer